
Little Debbie snack cakes have a way of instantly taking us back to childhood, don’t they? That crinkle of the wrapper, the sweet smell when you peel it open, and that first soft bite—pure comfort wrapped up in a tiny package. In this article, we’re going to explore why these nostalgic treats are so special, the key ingredients that make them irresistible, and how you can recreate the magic of Little Debbie snack cakes right in your own kitchen. I’ll walk you through everything step by step, sharing helpful tips, substitutions, and storage tricks along the way. By the end, you’ll have the confidence to whip up these beloved little cakes anytime your sweet tooth calls.

Why Little Debbie Snack Cakes Will Become Your Family’s Favorite
There’s something timeless about Little Debbie snack cakes that makes them more than just a quick sweet treat. They’ve been a lunchbox staple for generations, a reward after school, and a little pick-me-up tucked into a purse or pantry for those “just because” moments. But when you make them at home, that magic becomes even stronger—because now they’re baked with your love, your ingredients, and your creativity.
Your family will adore homemade Little Debbie snack cakes for so many reasons. First, they’re customizable. You can keep them true to the classics—soft chocolate layers filled with fluffy cream, golden sponge cake rolled with vanilla frosting, or oatmeal cookies hugging a sweet filling—or you can add your own twist. Imagine using a touch of cinnamon in the cream, swapping chocolate for peanut butter, or even making a seasonal pumpkin version in the fall.
Another reason they’ll become everyone’s favorite? Portion size. These little cakes are individually sized, making them perfect for tucking into lunchboxes, handing out at family gatherings, or serving as a special after-dinner treat without feeling too heavy. They’re the kind of dessert that satisfies without overwhelming.
Finally, homemade snack cakes are fresher and often healthier than the store-bought ones. You know exactly what’s going into them, you can control the sugar level, and you can even experiment with gluten-free or dairy-free variations if needed. They taste nostalgic, but they’re tailored to your family’s preferences.
So whether it’s a Saturday baking project with the kids, a sweet surprise tucked into your partner’s lunch, or a little treat you make just for yourself, these snack cakes are sure to become a household favorite in no time.
The Ingredients You Can’t Skip
Recreating Little Debbie snack cakes at home starts with the right ingredients. While there’s plenty of room to play and experiment, a few essentials give these cakes their signature taste and texture. Think of this as your “can’t skip” list for nailing that nostalgic bite.
1. Soft Cake Layers
At the heart of every snack cake is a tender, moist cake. Whether you’re making chocolate layers for a homemade version of the famous Swiss Roll or a golden vanilla sponge for a classic treat, the texture should be light but sturdy enough to hold fillings. Cake flour is the key here—it creates a softer crumb than all-purpose flour. If you don’t have cake flour, you can easily make your own by replacing two tablespoons of all-purpose flour with cornstarch for every cup.
2. The Sweet Cream Filling
The creamy center is what makes snack cakes so addictive. Traditional Little Debbie snack cakes use a marshmallow-fluff-style filling, whipped until airy. At home, you can achieve the same effect with butter, powdered sugar, marshmallow crème, and just a splash of vanilla. This filling should be fluffy, sweet, and stable enough to hold its shape when sandwiched between cake layers.
3. Quality Chocolate Coating
Many Little Debbie classics, like the Swiss Roll or the Fudge Round, are finished with a smooth chocolate shell. Using real semi-sweet or milk chocolate instead of candy melts makes a world of difference. A little bit of coconut oil mixed in helps achieve that glossy, snappy coating.
4. Oats for the Classics
If you’re making the beloved Oatmeal Creme Pie, rolled oats are essential. Quick oats give the cookies the right chewiness without being too chunky, while a dash of molasses adds that nostalgic flavor you remember from childhood.
5. Vanilla & Cocoa Powder
These two pantry staples are the unsung heroes of homemade snack cakes. Real vanilla extract deepens the cream filling, while high-quality cocoa powder makes the chocolate cakes rich and satisfying.
6. Sweeteners That Balance
Granulated sugar is the base, but don’t underestimate the role of brown sugar for added warmth and chewiness in cookies or honey for a delicate sweetness in sponge cakes.
7. A Pinch of Salt
Even in the sweetest desserts, a tiny pinch of salt makes the flavors pop. It’s the invisible ingredient that keeps your cakes from tasting flat.
When you gather these simple but essential ingredients, you’re already halfway to creating snack cakes that taste like a trip back in time. And the best part? You can mix and match to recreate your favorite Little Debbie varieties, from Nutty Bars to Zebra Cakes, all with ingredients you trust.
How to Make Little Debbie Snack Cakes Step-by-Step
Making Little Debbie snack cakes at home may sound like a big project, but once you break it down into steps, it becomes a fun and rewarding baking adventure. The secret is to think of these little cakes as mini desserts made up of three key parts: the cake, the filling, and sometimes the coating. Follow along, and soon you’ll have your own batch of snack cakes ready to delight your family.
Step 1: Prepare Your Pans and Oven
Preheat your oven to 350°F (175°C). Line baking sheets or jelly roll pans with parchment paper, making sure it hangs slightly over the edges so you can lift the cakes out easily later. Grease lightly to prevent sticking.
Step 2: Whip Up the Cake Batter
Start by whisking together your dry ingredients: cake flour, baking powder, salt, and (if you’re making chocolate cakes) cocoa powder. In a separate bowl, cream together butter and sugar until light and fluffy. Add eggs one at a time, beating well after each. Stir in vanilla extract for that warm, classic flavor.
Next, alternate adding the dry mixture and milk (or buttermilk) to the butter mixture, mixing just until smooth. The batter should be light and pourable but not runny. Spread the batter evenly into your prepared pans.
Step 3: Bake and Cool
Bake for about 10–12 minutes for thin layers or 15–20 minutes for thicker ones, depending on your snack cake style. Keep an eye on them—they should spring back when touched lightly in the center. Once baked, let them cool completely on wire racks before adding any filling.
Step 4: Make the Cream Filling
While the cakes cool, prepare the filling. Beat softened butter until creamy, then slowly add powdered sugar and marshmallow crème. A splash of vanilla and a pinch of salt round out the flavor. Whip until the mixture is fluffy and spreadable. If it feels too stiff, add a teaspoon of milk; if too soft, add a little more powdered sugar.
Step 5: Assemble the Snack Cakes
Depending on which variety you’re making, here are a few ways to assemble:
- For Swiss Roll-style cakes: Spread filling over a thin chocolate cake layer, then carefully roll it up from one end using the parchment paper to guide you. Slice into individual rolls.
- For sandwich-style cakes: Cut out rounds of cake, spread filling on one, and top with another.
- For oatmeal creme pies: Bake oat-based cookies and sandwich the cream filling between two cookies.
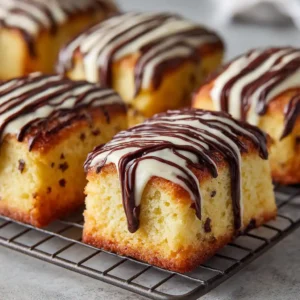
- For Zebra Cakes or chocolate-coated styles: Stack layers with filling, then dip or drizzle with melted chocolate coating.
Step 6: Add the Chocolate Coating (Optional)
Melt semi-sweet or milk chocolate with a teaspoon of coconut oil until smooth. Dip the assembled cakes in chocolate or drizzle over the top. Place them on parchment paper to set. For an authentic Zebra Cake look, drizzle thin stripes of white chocolate across the top.
Step 7: Let Them Set and Store Properly
Allow your snack cakes to set at room temperature for about 30 minutes, or pop them into the fridge for quicker results. Once firm, transfer to an airtight container. They’ll stay fresh for about 4–5 days at room temperature, or you can refrigerate them for up to a week. If you want to plan ahead, these also freeze beautifully—just wrap each cake in plastic wrap before freezing.
And there you have it—your own homemade Little Debbie snack cakes! They’re soft, sweet, creamy, and filled with all the nostalgia you remember, only better because they came from your kitchen.
FAQs About Little Debbie Snack Cakes
1. Can I really make Little Debbie snack cakes at home?
Absolutely! While the originals are mass-produced, the flavors and textures can be recreated in a home kitchen with a little care. The key is using tender cake layers, fluffy cream filling, and (for some varieties) a chocolate coating. Homemade versions not only taste fresher but also let you control ingredients, sweetness, and portion sizes.
2. What’s the best way to store homemade Little Debbie snack cakes?
To keep them fresh, store your snack cakes in an airtight container at room temperature for 4–5 days. If your kitchen is warm, you may want to refrigerate them to keep the filling stable. For longer storage, wrap each cake in plastic wrap and freeze for up to two months. Thaw at room temperature before enjoying.
3. Can I make gluten-free or dairy-free snack cakes?
Yes, you can! Substitute a high-quality gluten-free flour blend for the cake flour, and make sure your oats (if using) are certified gluten-free. For dairy-free, replace butter with plant-based butter and use a dairy-free milk alternative like almond, oat, or coconut milk. Even the chocolate coating can be made dairy-free with vegan chocolate chips.
4. Do I need special equipment to make them?
Not at all. A basic hand mixer or stand mixer will make whipping the cream filling easier, but beyond that, you just need standard baking tools—mixing bowls, pans, and parchment paper. A jelly roll pan helps for Swiss Roll-style cakes, but it’s not mandatory.
5. Which Little Debbie snack cake flavors are easiest to start with?
If you’re new to making them, start with Oatmeal Creme Pies or sandwich-style snack cakes, since they don’t require rolling or dipping. Once you’re comfortable, you can move on to Swiss Rolls or Zebra Cakes, which involve rolling cakes and adding chocolate coatings. Each version has its own charm, so you can work your way through them like a sweet little baking adventure.
Let Me Know If You Fall in Love…

Homemade Little Debbie snack cakes are more than just sweet treats—they’re little bites of nostalgia, wrapped in layers of love, and perfect for sharing with the people who matter most. Whether you’re baking them for your kids, surprising your partner with a lunchbox treat, or simply making them to relive your own childhood memories, each batch carries that cozy, heartwarming feeling of comfort food at its best.
I’d love to hear from you if you try making these! Did you stick to the classics, or did you add your own creative twist? Maybe you made oatmeal creme pies with an extra dash of cinnamon, or perhaps you tried your hand at Zebra Cakes with fun drizzle designs. However you choose to enjoy them, I hope these little cakes bring just as much joy to your kitchen as they did to mine.
If you fall in love with them—and I think you will—don’t forget to share your experience. Your story might inspire someone else to bake their own batch of Little Debbie magic at home.
Little Debbie Snack Cakes
Equipment
- Mixing Bowls
- Hand Mixer or Stand Mixer
- Jelly roll pan or baking sheet
- Parchment paper
- Wire rack
- Spatula
- Knife
- Double boiler or microwave-safe bowl
Ingredients
Cake Layer
- 1 cup cake flour
- 2 tbsp cocoa powder omit for vanilla sponge
- 1 tsp baking powder
- 1/4 tsp salt
- 1/2 cup unsalted butter softened
- 3/4 cup granulated sugar
- 2 large eggs
- 1/2 cup milk or buttermilk
- 1 tsp vanilla extract
Cream Filling
- 1/2 cup unsalted butter softened
- 1 1/2 cups powdered sugar
- 1 cup marshmallow crème
- 1 tsp vanilla extract
- salt pinch
Optional Chocolate Coating
- 1 1/2 cups semi-sweet chocolate chips
- 1 tbsp coconut oil
Instructions
- Preheat oven to 350°F (175°C). Line a jelly roll pan with parchment paper and lightly grease.
- In a bowl, whisk flour, cocoa powder (if using), baking powder, and salt.
- In another bowl, cream butter and sugar until fluffy. Add eggs one at a time, then stir in vanilla.
- Gradually add dry mixture, alternating with milk, until batter is smooth.
- Spread batter into prepared pan and bake 12–15 minutes until cake springs back when touched. Cool completely.
- Meanwhile, make filling by beating butter until creamy. Add powdered sugar, marshmallow crème, vanilla, and salt. Whip until fluffy.
- Cut cake into desired shapes (rectangles, circles, or strips). Spread filling on one piece and sandwich with another.
- (Optional) Melt chocolate and coconut oil until smooth. Dip or drizzle cakes, then place on parchment to set.
- Let snack cakes rest for 30 minutes before serving. Store in airtight container for up to 5 days.