
No-Bake Pumpkin Cheesecake Bars with Biscoff Crust are pure autumn comfort in dessert form. Imagine the creamy richness of cheesecake meeting the cozy flavor of pumpkin pie. Now picture it all resting on a buttery, spiced Biscoff cookie crust. These bars bring all the fall flavors you love without ever turning on the oven.
In this article, I’ll share why this dessert feels so special, the key ingredients that make it shine, and easy step-by-step instructions. You’ll also find storage tips, creative variations, and answers to common questions so your cheesecake bars turn out perfect every time. By the end, you’ll be ready to make a batch for family gatherings—or enjoy a square or two straight from the fridge.

Why No-Bake Pumpkin Cheesecake Bars with Biscoff Crust Will Become Your Family’s Favorite
There’s something magical about no-bake desserts, and these pumpkin cheesecake bars are no exception. They take all the stress out of holiday baking while still giving you a treat that looks and tastes impressive. No oven, no water baths, and no long cooling times—just simple, creamy goodness.
The Biscoff crust adds an extra layer of flavor you won’t get with plain graham crackers. Those caramelized, spiced cookies pair beautifully with pumpkin, giving every bite a cozy, spiced sweetness. Together, the crust and cheesecake filling create a dessert that’s rich yet light enough to enjoy after a hearty fall dinner.
Another reason families love this recipe is how easy it is to prepare ahead of time. You can make the bars a day in advance, let them chill in the fridge, and they’re ready when you need them. No last-minute baking stress, just effortless dessert on the table.
Kids and adults alike adore these cheesecake bars. The pumpkin flavor is mild and creamy, not overpowering, making it a treat that even picky eaters enjoy. The smooth texture also makes them perfect for serving in neat little squares at parties, potlucks, or cozy nights at home.
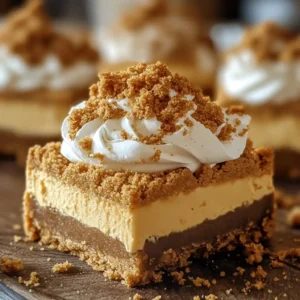
These bars are versatile, too. You can add a swirl of whipped cream, sprinkle on some crushed Biscoff cookies, or even drizzle caramel sauce for an extra touch of indulgence. They’re beautiful enough for special occasions but simple enough for everyday enjoyment.
No-Bake Pumpkin Cheesecake Bars with Biscoff Crust
Equipment
- 8×8-inch baking dish (lined with parchment)
- Hand Mixer or Stand Mixer
- Mixing Bowl
- Spatula
- Food Processor or Rolling Pin
Ingredients
Crust
- 2 cups Biscoff cookies crushed into fine crumbs
- 6 tbsp unsalted butter melted
Cheesecake Filling
- 16 oz cream cheese softened
- 1 cup pumpkin purée 100% pure, not pie filling
- 1 cup powdered sugar
- 1 tsp vanilla extract
- 2 tsp pumpkin pie spice
- 1 1/2 cups heavy whipping cream cold
Optional Toppings
- Whipped cream swirls
- Crushed Biscoff cookies
- Caramel drizzle
Instructions
- Prepare the Crust: Crush Biscoff cookies into fine crumbs using a food processor or rolling pin. Mix with melted butter until fully combined. Press mixture firmly into the bottom of a parchment-lined 8×8-inch baking dish. Chill while making the filling.
- Whip the Cream: In a chilled bowl, whip the heavy cream until stiff peaks form. Set aside.
- Make the Cheesecake Base: Beat softened cream cheese in a large bowl until smooth. Add powdered sugar, vanilla extract, and pumpkin pie spice. Mix until fluffy. Add pumpkin purée and blend until fully incorporated.
- Fold in Whipped Cream: Gently fold the whipped cream into the pumpkin mixture using a spatula. Work slowly to keep the filling light and airy.
- Assemble: Spread filling evenly over the prepared Biscoff crust. Smooth the top with a spatula.
- Chill: Cover with plastic wrap and refrigerate for at least 6 hours, or overnight, until firm.
- Slice and Serve: Lift the cheesecake out of the pan using the parchment paper. Slice into 12 squares with a sharp knife, wiping between cuts for clean edges. Garnish with whipped cream, cookie crumbs, or caramel if desired.
Notes
The Ingredients You Can’t Skip
Every great dessert starts with the right ingredients, and No-Bake Pumpkin Cheesecake Bars with Biscoff Crust are no exception. Each part of this recipe plays an important role in creating the perfect creamy, spiced, and utterly irresistible bite. Let’s break down the essentials and talk about why they matter.
Biscoff Cookies
The star of the crust. Biscoff cookies have a warm, caramelized flavor with hints of cinnamon and brown sugar. They create a crust that’s more flavorful than traditional graham crackers. If you can’t find Biscoff, you can use gingersnaps or graham crackers, but the unique flavor of Biscoff is hard to beat.
Unsalted Butter
Butter binds the crushed cookies together and adds richness to the crust. It gives you that firm yet tender base that holds up against the creamy filling. Always melt the butter completely before mixing it with the crumbs for even coating.
Cream Cheese
The heart of the cheesecake layer. Cream cheese creates that tangy, rich, and creamy base we all love. Use full-fat cream cheese for the best texture—it makes the bars velvety smooth and satisfying. Let it soften at room temperature before mixing to avoid lumps.
Pumpkin Purée
This is where the autumn magic comes in. Pumpkin purée adds flavor, color, and moisture to the cheesecake layer. Be sure to use 100% pure pumpkin, not pumpkin pie filling, which has added spices and sugar. Fresh homemade pumpkin purée also works if you have it on hand.
Powdered Sugar
This sweetens the filling without adding graininess. Powdered sugar blends easily with cream cheese and pumpkin, keeping the filling smooth. Granulated sugar won’t give the same silky texture, so stick with powdered here.
Vanilla Extract
Just a splash enhances the pumpkin flavor and makes the cheesecake taste more rounded. Pure vanilla extract works best, but high-quality imitation vanilla will still add warmth.
Pumpkin Pie Spice
This spice blend pulls the whole recipe together. Cinnamon, nutmeg, ginger, and cloves bring that cozy pumpkin pie flavor we all crave. If you don’t have pumpkin pie spice, you can mix your own with equal parts cinnamon, nutmeg, and ginger, plus a pinch of cloves.
Heavy Whipping Cream
Instead of using eggs like a baked cheesecake, we rely on whipped cream to give the filling structure and lightness. Folding in whipped cream makes the bars fluffy while keeping them rich. Make sure your cream is cold before whipping for the best volume.
Optional Garnishes
Whipped cream swirls, crushed Biscoff cookies, or a caramel drizzle make these bars extra special. While not essential, they turn a simple treat into a dessert that looks bakery-worthy.
With these ingredients, you get a crust that’s crunchy yet tender and a filling that’s smooth, creamy, and perfectly spiced. Each component is simple, but together they create a dessert you’ll want to make all season long.
How to Make No-Bake Pumpkin Cheesecake Bars with Biscoff Crust Step-by-Step

Making these bars is as simple as layering flavors. No oven, no water bath, no fuss—just easy mixing and chilling. Here’s a step-by-step guide to walk you through the process so you can make them with confidence.
Step 1: Prepare the Crust
Start by crushing your Biscoff cookies into fine crumbs. You can use a food processor for a quick, even texture, or place the cookies in a sealed bag and crush them with a rolling pin. Mix the crumbs with melted butter until they’re fully coated. Press this mixture firmly into the bottom of a lined baking pan. Use the back of a spoon or the bottom of a glass to pack it down evenly. Place the pan in the fridge while you prepare the filling so the crust can firm up.
Step 2: Whip the Cream
In a chilled bowl, whip the heavy cream until stiff peaks form. This step is important because the whipped cream gives the cheesecake filling its light, airy texture. Once whipped, set the cream aside while you work on the pumpkin mixture.
Step 3: Make the Cheesecake Base
In a large mixing bowl, beat the softened cream cheese until smooth and creamy. Add powdered sugar, vanilla extract, and pumpkin pie spice. Beat again until everything is fully combined and fluffy. Next, mix in the pumpkin purée until you have a silky, spiced pumpkin cheesecake mixture.
Step 4: Fold in the Whipped Cream
Gently fold the whipped cream into the pumpkin cheesecake mixture. Use a spatula and work slowly so you don’t lose the air you whipped into the cream. The filling should look smooth, fluffy, and light orange in color.
Step 5: Assemble the Bars
Take the crust out of the fridge and pour the pumpkin cheesecake filling over it. Spread the mixture evenly with a spatula, making sure it reaches all corners of the pan. Smooth out the top for a clean finish.
Step 6: Chill the Cheesecake
Cover the pan with plastic wrap or foil and refrigerate for at least 6 hours, though overnight is best. The longer it chills, the firmer the bars will be, making them easier to slice cleanly.
Step 7: Slice and Serve
Once the bars are fully set, lift them out of the pan using the parchment paper lining. Place them on a cutting board and slice into neat squares with a sharp knife. For the cleanest cuts, wipe the knife after each slice.
Step 8: Garnish (Optional but Recommended)
Top each bar with a swirl of whipped cream, a sprinkle of crushed Biscoff cookies, or a drizzle of caramel sauce. This step isn’t required, but it adds a touch of bakery-style presentation that makes these bars even more special.
And just like that, your No-Bake Pumpkin Cheesecake Bars with Biscoff Crust are ready to enjoy. They’re creamy, spiced, and perfectly chilled—the ideal make-ahead dessert for fall gatherings or cozy nights at home.
FAQs about No-Bake Pumpkin Cheesecake Bars with Biscoff Crust
1. Can I make these pumpkin cheesecake bars ahead of time?
Yes! These bars are actually best when made in advance. The filling needs time to chill and set, so preparing them the night before works perfectly. You can store them in the fridge for up to 4 days, covered tightly with plastic wrap or in an airtight container.
2. What can I use instead of Biscoff cookies for the crust?
If Biscoff cookies aren’t available, gingersnaps or graham crackers are great alternatives. Gingersnaps add extra spice, while graham crackers keep the flavor mild and classic. However, Biscoff has a unique caramelized taste that pairs especially well with pumpkin.
3. How do I make clean slices without the filling sticking to the knife?
For neat, bakery-style squares, use a sharp knife and wipe it clean after every cut. You can also dip the knife into hot water, wipe it dry, and then slice. This helps glide through the creamy filling without dragging crumbs across the top.
4. Can I freeze no-bake pumpkin cheesecake bars?
Yes, these bars freeze beautifully. After they’ve chilled and set in the fridge, slice them into squares and wrap each piece tightly in plastic wrap. Place the wrapped bars in a freezer-safe container or bag. They’ll keep well for up to 2 months. When ready to eat, thaw them in the fridge overnight.
5. How can I make these cheesecake bars lighter or healthier?
For a lighter version, you can use reduced-fat cream cheese and swap heavy cream with whipped coconut cream for a dairy-free twist. You can also cut back slightly on the sugar or use a natural sweetener like maple syrup or honey, though it may slightly change the texture.
Let Me Know If You Fall in Love…
No-Bake Pumpkin Cheesecake Bars with Biscoff Crust are more than just a dessert. They’re a way to slow down and savor the cozy flavors of fall with the people you love most. Every bite is creamy, spiced, and comforting, with that buttery Biscoff crust adding just the right crunch.
I love making these for gatherings, but honestly, they never last long enough to share. Once you try them, I think you’ll understand why. They’re easy to prepare, require no oven, and can be made ahead of time—everything a home baker dreams of when life gets busy.
So, if you give this recipe a try, let me know if it becomes a new favorite in your home. I’d love to hear how you served them—whether you kept them simple or added whipped cream, caramel drizzle, or extra cookie crumbs. These little squares of joy are meant to be shared, and I hope they bring you the same comfort and happiness they bring to my kitchen.