
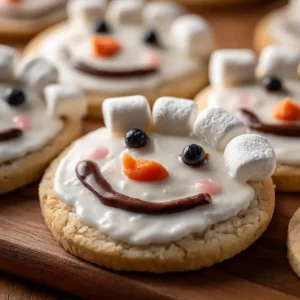
Melting Snowman Cookies bring a touch of winter magic straight to your kitchen. These playful treats start with soft sugar cookies, topped with creamy white icing that looks just like fresh snow. A fluffy marshmallow becomes the snowman’s “head,” slowly sinking into the frosting to create that adorable melting look. Every cookie feels like a tiny story on a plate, and each bite is as sweet as the season itself.

In this article, I’ll show you why Melting Snowman Cookies win hearts so quickly. You’ll discover the must-have ingredients, learn a simple step-by-step decorating method, and pick up tips for easy swaps and storage. I’ll also answer common baking questions so you feel confident before your first batch. By the end, you’ll be ready to bake cookies that make kids giggle, grown-ups smile, and holiday tables shine.
Why Melting Snowman Cookies Will Become Your Family’s Favorite
There’s something irresistible about cookies that make you smile before you even take a bite. Melting Snowman Cookies are more than just a holiday dessert. They’re a fun family project, a way to spark laughter, and a treat that feels extra special during the winter season.
Kids love them because every cookie has its own personality. Some snowmen look surprised, others look sleepy, and a few melt into the funniest shapes. Decorating turns into playtime, and no two batches ever look exactly the same. Parents love them too because they combine simple sugar cookie goodness with a festive design that never fails to impress.
These cookies also carry a touch of nostalgia. They remind you of snow days, cozy blankets, and afternoons spent building snowmen outside. Now you can bring that feeling indoors with a plate of warm, homemade cookies. Even if you don’t live where it snows, these treats let you capture the spirit of winter in the sweetest way possible.
And let’s not forget the taste. The sugar cookies stay soft and buttery, while the frosting adds creamy sweetness. The marshmallow head brings a light, fluffy texture that melts in your mouth. Put it all together, and you have a dessert that’s as delicious as it is delightful to look at.
For holiday gatherings, bake sales, or simple family nights at home, Melting Snowman Cookies steal the show. They’re cute, festive, and so easy to fall in love with. Once you bake them, you’ll see why they don’t last long on the plate.
The Ingredients You Can’t Skip
Every great cookie begins with the right ingredients, and Melting Snowman Cookies are no exception. While you can have fun with decorations and little twists, there are a few essentials that give these cookies their soft texture and irresistible flavor. Here’s what you’ll need:
Sugar Cookie Base
The heart of these cookies is a classic sugar cookie. Soft, buttery, and just sweet enough, it creates the perfect canvas for decorating. You can make your dough from scratch or use a quality store-bought mix if you’re short on time. The important thing is that the cookie holds its shape while baking so it can support all the fun toppings.
Icing for the “Snow”
The white “melted snow” is what brings these cookies to life. A smooth royal icing or a simple powdered sugar glaze works beautifully. Royal icing sets with a glossy finish, making it perfect for stacking or transporting. A glaze is softer and a little easier for kids to work with, especially if they’re helping decorate.
Marshmallow Heads
This is where the magic happens. Each marshmallow becomes a snowman’s head. As it sinks into the icing, it creates that adorable melting effect. Standard-size marshmallows work best, though you can trim them slightly if you prefer smaller heads.
Edible Decorations
Candy eyes, mini chocolate chips, or even tiny sprinkles make the perfect snowman features. Use orange icing or a small candy piece for the nose, and chocolate piping for smiles or funny expressions. Pretzel sticks can stand in for arms, adding another playful detail.
Optional Extras
Want to dress up your snowmen even more? Try adding a scarf with licorice strings, or give each snowman buttons made of colorful mini candies. These little details make your cookies feel even more personal and festive.
When you gather these simple ingredients, you’re ready to create cookies that are not just tasty but also full of personality. The beauty of Melting Snowman Cookies is that you don’t need fancy tools or hard-to-find supplies. Just a few pantry staples and some creativity will do the trick.
How to Make Melting Snowman Cookies Step-by-Step
Baking these cookies is just as fun as eating them. Even if you’re not an expert decorator, the melting snowman design is very forgiving. In fact, the messier the icing looks, the cuter the snowmen appear! Here’s how to bring these magical cookies to life from start to finish.
Making the Cookie Dough
Start with your sugar cookie dough. If you’re making it from scratch, cream together butter and sugar until light and fluffy, then mix in eggs and vanilla. Add flour, baking powder, and a pinch of salt until the dough comes together. Wrap it in plastic wrap and let it chill in the refrigerator for at least 30 minutes. This step keeps the cookies from spreading too much while baking.
Rolling and Baking the Cookies
On a lightly floured surface, roll the chilled dough to about ¼ inch thick. Use a round cookie cutter (or even the rim of a glass) to cut out circles. These circles will form the snowy base for your melting snowmen. Place them on a lined baking sheet, leaving space in between.
Bake the cookies in a preheated oven at 350°F (175°C) for 8–10 minutes, or until the edges are just beginning to turn golden. You want them soft in the center so they stay tender after cooling. Let the cookies rest on the baking sheet for a couple of minutes, then move them to a wire rack to cool completely before decorating.
Preparing the Icing
While the cookies cool, prepare your icing. For royal icing, whisk together powdered sugar, meringue powder, and water until smooth and slightly thick. For a glaze, combine powdered sugar with a little milk and vanilla. Either option should be pourable but thick enough to hold its shape on the cookie.
Creating the Melting Snow Effect
Spoon or pipe icing onto the center of each cooled cookie, letting it naturally spread toward the edges. Don’t worry about making it perfectly smooth—the uneven edges make it look more like real melting snow.
Adding the Marshmallow Heads
Before the icing sets, press one marshmallow onto the cookie near the top edge so it looks like the snowman is sinking into the frosting. Tilt the marshmallow slightly to give your snowman more character.
Decorating Faces and Arms
Use black icing, melted chocolate, or edible markers to add eyes, a smile, and stick arms. For the nose, add a small orange sprinkle, candy, or a tiny dab of orange icing. Each snowman can have a different expression—silly, happy, or even sleepy.
Adding Extra Decorations
If you want to dress up your snowmen, give them scarves made from licorice laces, buttons made of colorful candies, or even little hats with chocolate chips and candy dots. Kids especially love adding these finishing touches.
Setting and Storing the Cookies
Allow the decorated cookies to sit at room temperature until the icing hardens slightly. If you’re using royal icing, it will firm up beautifully. For glaze icing, the cookies may stay a little softer but just as tasty.
Storage Tip: Keep your cookies in an airtight container at room temperature for up to 5 days. If stacking them, place a piece of parchment paper between layers to protect the decorations. You can also freeze undecorated sugar cookies for up to 2 months, then thaw and decorate when you’re ready.
FAQs About Melting Snowman Cookies
1. Can I use store-bought cookie dough for Melting Snowman Cookies?
Yes, absolutely! If you’re short on time, store-bought sugar cookie dough works perfectly. Just make sure to chill the dough before baking so the cookies don’t spread too much. Homemade dough gives a richer flavor, but store-bought saves time and still delivers a delicious result.
2. What kind of icing works best for the melting snow effect?
Royal icing is the most reliable because it sets with a glossy finish and holds its shape well. If you want something easier for kids to use, a simple powdered sugar glaze also works. The glaze won’t harden as much, but it gives a soft, snowy look that’s just as charming.
3. How far in advance can I make Melting Snowman Cookies?
You can bake the cookies a day or two in advance and store them in an airtight container before decorating. Once decorated, they stay fresh for about 4–5 days at room temperature. For longer storage, freeze the plain baked cookies and decorate them when you’re ready to serve.
4. How can I make my snowmen look different from each other?
That’s the fun part! Tilt the marshmallow heads at different angles, draw unique facial expressions, and use colorful candies for scarves, hats, and buttons. No two snowmen have to look alike, and the variety makes your cookie tray even more eye-catching.
5. Can I make Melting Snowman Cookies without royal icing?
Yes! If you don’t want to make royal icing, use a powdered sugar glaze or even melted white chocolate. Both options create the same snowy base and taste wonderful. The only difference is how firm the final texture will be.
Let Me Know If You Fall in Love…
Melting Snowman Cookies aren’t just treats—they’re little pieces of joy. Each one tells its own story with a silly face, a droopy marshmallow head, or a colorful candy scarf. They make children giggle, they make adults nostalgic, and they bring a playful sparkle to any holiday table.
What I love most is how simple they are to create. You don’t need advanced decorating skills to make these cookies shine. In fact, their slightly “messy” look is what makes them even more charming. The whole family can gather around the table, decorating together, laughing at crooked noses and funny smiles, and enjoying a cozy afternoon of baking.
So, if you’re looking for a dessert that’s as heartwarming as it is tasty, give these cookies a try. Whether you’re baking them for a holiday party, a classroom celebration, or just a quiet weekend at home, they’ll quickly earn a place in your family’s traditions.
If you do make a batch, I’d love to hear from you. Share your creations, tell me how your family reacted, and let me know if these melting little snowmen won your heart the way they did mine.
Melting Snowman Cookies
Equipment
- Mixing Bowl
- Rolling Pin
- Baking sheet
- Wire cooling rack
- Piping bag or spoon
Ingredients
Sugar Cookie Dough
- 1 cup unsalted butter softened
- 1 cup granulated sugar
- 1 large egg
- 1 tsp vanilla extract
- 2 1/2 cups all-purpose flour
- 1 tsp baking powder
- 1/4 tsp salt
Icing & Decorations
- 2 cups powdered sugar for icing
- 2–3 tbsp milk for icing
- 1 tsp vanilla extract for icing
- 12 large marshmallows
- candy eyes, mini chocolate chips, or edible markers for faces
- orange sprinkles or icing for noses
- licorice strings or small candies for scarves/buttons
Instructions
- In a mixing bowl, cream butter and sugar until light and fluffy.
- Add egg and vanilla; mix well.
- Stir in flour, baking powder, and salt until dough forms. Wrap in plastic and chill for 30 minutes.
- Roll dough to ¼-inch thickness. Cut circles with a cookie cutter.
- Place on a lined baking sheet and bake at 350°F (175°C) for 8–10 minutes until edges are lightly golden. Cool completely.
- Prepare icing: whisk powdered sugar, milk, and vanilla until smooth. Adjust consistency with more sugar (thicker) or milk (thinner).
- Spoon or pipe icing onto cooled cookies to create the melted snow look.
- Press a marshmallow onto each cookie for the snowman’s head.
- Use icing, candies, or edible markers to draw faces and arms. Add scarves or buttons for decoration.
- Let cookies sit until icing sets before serving.